Following my recent post regarding my plan to review various HDR solutions, here is a review of the first HDR software solution I tested – Photomatix Pro by HDR Soft.
Before getting into the results, I want to first present the images I will be using to test each solution. I thought it would be useful to compare each software using 3 different picture situations to see if the HDR software solutions were better equipped at dealing with certain image properties. The 3 situations I selected were: Evening Urban, Landscape and Interior.
For each, I took 3 bracketed exposures (-2ev, 0ev, +2ev). All images were taken as RAW files using a Nikon D40X.
Evening Urban:
- Lens: Sigma 10-20mm f4.0
- ISO: 100
- Focal Length: 15mm
- App: f5.6
- Exp: 1/8 sec
- Exp: 0.5 sec
- Exp: 1.8 sec
Landscape
- Lens: Nikkor 18-55 mm f3.5
- ISO: 100
- Focal Length: 18mm
- App: f22
- Exp: 1/4 sec
- Exp: 1 sec
- Exp: 3.6 sec
Interior
- Lens: Nikkor 18-55 mm f3.5
- ISO: 100
- Focal Length: 18mm
- App: f8
- Exp: 1/13 sec
- Exp: 1/3 sec
- Exp: 1.3 sec
Test results for Photomatix Pro
I should at the outset explain that out of all the HDR solutions I will be testing that I have spent more time using the Photomatix software and therefore generally more familiar with the controls available. However, not yet having purchased any HDR solution (but looking into buying in the near future), I’m approaching each test with a non-biased view.
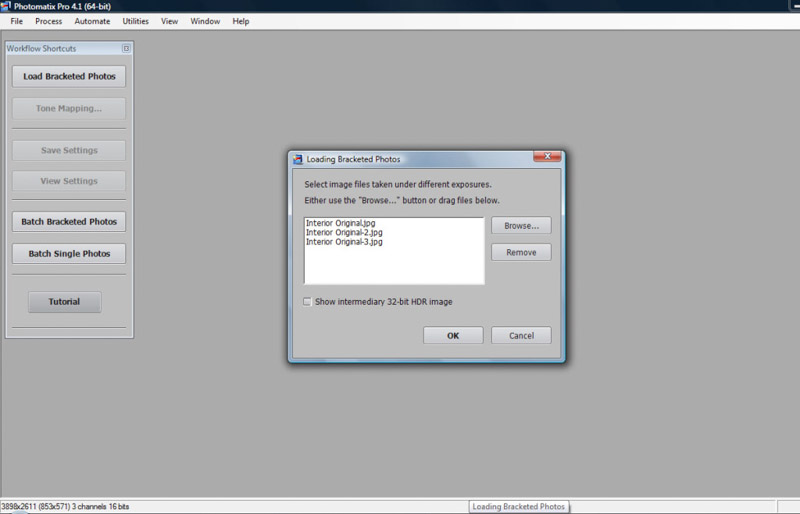
When you first open Photomatix Pro, you are presented with the following screen:
You will see that Photomatix provides the option to upload a set of bracketed photos, batch process sets of bracketed files and also offers the ability to process single images. For the test I uploaded each set of 3 separately.
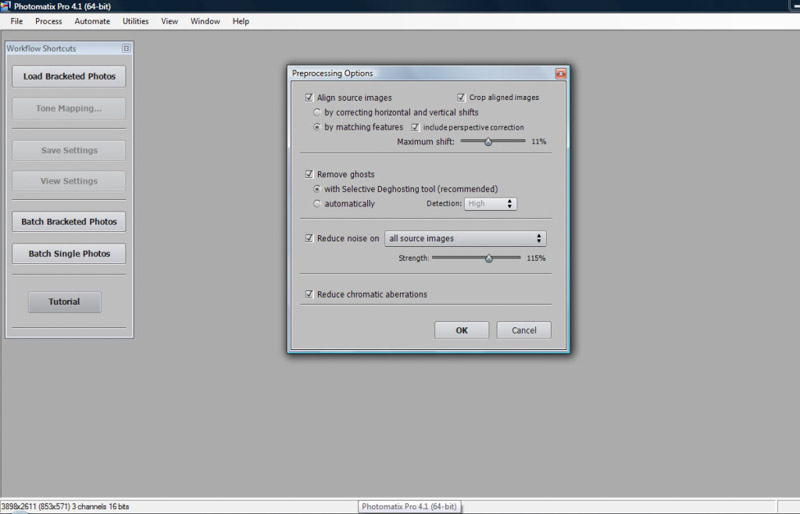
The pre-processing options allow you to align your sourced images (including a perspective correction), removal of ghosts (automatic or manual), noise reduction and chromatic aberration reduction.
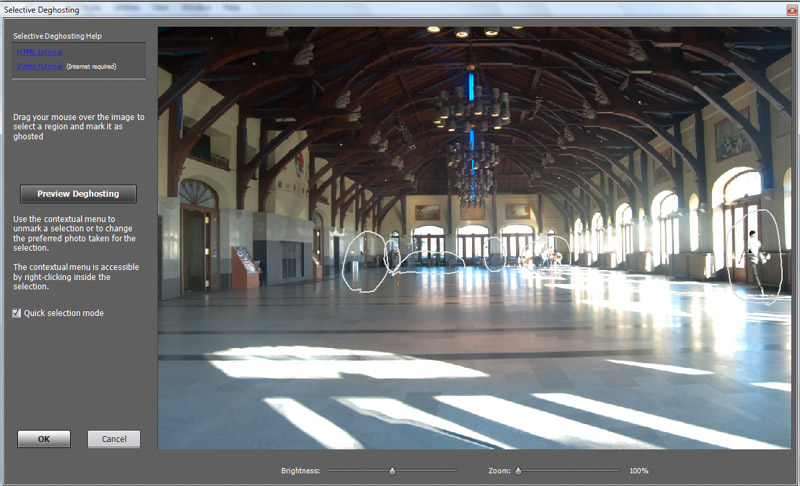
The deghosting feature provides the option to manualy select the ghosts you wish to remove. In the interior shots I had people moving between the frames, so I circled these to see how well Photomatix would handle ghosting.
You will see that Photomatix did a pretty good job of removing many of the ghosts.
All the images being used for the testing were shot with a tripod, so I’m not able to comment on the ability for Photomatix to align shots in cases where shots are taken handheld.
Photomatix presents the user with an initial default HDR image. The 3 screenshots below show the initial results:
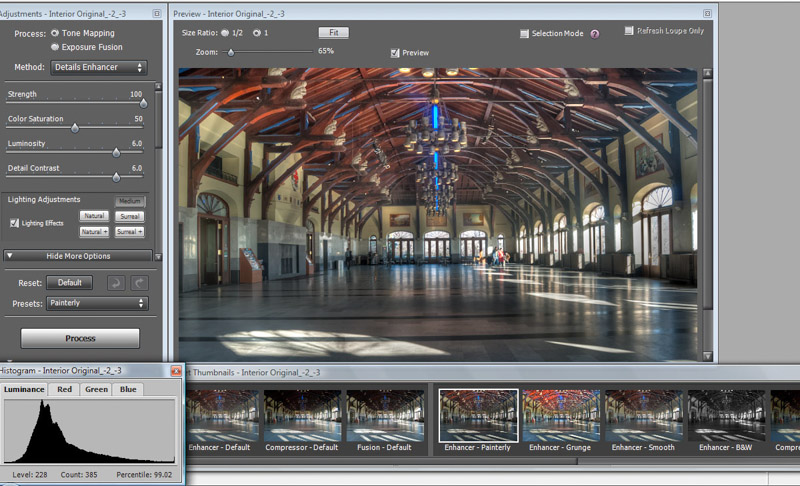
Photomatix povides 12 preset options to select from (encompassing Tone Mapping and Exposure Fusion processes) which you can select from and then refine using the sliders on the left hand panel. The built-in presets provide a wide range of effects from light tone mapped/exposure fusion to heavy grunge style. You can check out the gallery below for an idea of the different options the pre-selects provide.
- night fusion intensive
- night fusion default
- night fusion auto
- night fusion adjusted
- night fusion 2images
- night enhancer def
- night enhancer smooth
- night enhancer painterly
- night enhancer grunge
- night enhancer bw
- night compressor default
- night compressor deep
- landscape fusion intensive
- landscape fusion default
- landscape fusion auto
- landscape fusion adjusted
- landscape fusion 2images
- landscape enhancer default
- landscape enhancer smooth
- landscape enhancer painterly
- landscape enhancer grunge
- landscape enhancer bw
- landscape compressor default
- landscape compressor deep
- interior fusion intensive
- interior fusion default
- interior fusion auto
- interior fusion adjusted
- interior fusion 2images
- interior enhancer default
- interior enhancer smooth
- interior enhancer painterly
- interior enhancer grunge
- interior enhancer bw
- interior compressor default
- interior compressor deep
The left hand panel provides a number of sliders to refine your image:
At the bottom of the side panel, is a useful help tool that describes what each slider does.
Halos are a common problem encountered when processing HDR photos. Halos will often appear where dark objects intersect with light areas (eg buildings against sky). Fortunately in my test images I didn’t really experience a major issue with halos. Maybe this is a strength with Photomatix and will be interesting to see if the other softwares produce halos in the results. To test how Photomatix is able to minimize halos, I uploaded the following image that does suffer from haloing around the building and trees:
By using the Smooth Highlights slider I was able to remove the offending Halo quite easily:
In regard to comparing the broad features offered by each HDR solution, the following table will be created for each software tested.
| Feature | Photomatix |
|---|---|
| Operating system compatibility | Windows/Mac OS X |
| Stand-alone | Yes |
| plugin support | Lightroom, Aperture (limited features), Photoshop (filters) |
| Single image processing | Yes |
| Batch processing | Yes |
| RAW file support | Yes |
| Pre-set options | Yes/12 |
| Image alignment | Yes |
| Anti-ghosting | Yes |
| Localized Selection | Yes |
| Interface design | Good |
| Help Menu/Tutorial | Yes |
| Trial Version | Yes – full feature access, unlimited but adds watermark to processed images |
| Cost | 99USD |
In addition to the Pro version, I should point out that there is also a lighter version available called Essentials 3 that costs just 39USD. This is a Stand-alone program (no Lightroom plug-in option) and doesn’t include selective deghosting, batch processing or chromatic aberration reduction options. In addition Essentials 3 does not provide access to the advanced options, such as smooth highlighting which as I noted above is useful for removing unwanted halos. However, if you are just looking at starting out with HDR, Essentials 3 should have all the tools you need.
Although many people will use additional photo editing software to further refine the image (such as Photoshop), it is worth noting that Photomatix Pro does offer some advanced tools – like the localized Selection tool using a lasso tool allowing you to replace parts of your HDR image with one of the original images. I did give the tool a quick test and while the lasso tool works well, I find Photoshop is a better option when looking to adjust your image at a layer level.
A feature that I would like to see would be the ability to tone map by selective area – similar to what Nik Software provide in their HDR Efex Pro software.
In conclusion, in all 3 scenarios tested, Photomatix Pro performed well, was relatively simple to learn and the interface is easy to work with. At $99 it’s reasonably affordable for anyone looking to produce HDR images.
Score: 8/10
About Photomatix Pro
The developer of Photomatix Pro – HDRsoft – is a French registered company and was a pioneer of HDR photography when they released the first version of Photomatix in February 2003. The company comprises professional photographers and programmers based around the World.
To view more information and download a free trial head over to the HDRsoft website. The trial is fully functional and never expires but adds watermarks to the images, so if you want to give HDR photography a try, the Photomatix free trial is a good starting point.
SAVE 15% – If you decide to purchase after your free trial, use the coupon code ‘MontrealInPictures’ to receive 15% discount on your purchase.


